Preparing Mashed Potatoes sounds easy enough but how many times have you eaten pasty thick under seasoned Mashed Potatoes? Mashed Potatoes must be the ultimate of American Comfort foods. They go with almost anything and if prepared right are flavorful and silky and often are the star of the meal, outshining the main dish. Topping Mashed Potatoes with Homemade Gravy can only improve on perfection. Mashed Potatoes go perfect with Butter Roasted Chicken and the ultimate classic Meatloaf . The key to a great Mashed Potato is not over mixing and using a ricer or food mill to mash the Potatoes. Lots of Butter and Cream don't hurt either. When you are Cooking The Amazing your Mashed Potatoes will be perfect and delicious every time.
Here is the recipe.
2 1/2 lbs Yukon Gold Potatoes
1 T Fine Grain Sea Salt
Water For Cooking
4 T Cold Butter
1 t Fine Grain Sea Salt
1 t Fresh Ground Black Pepper
1/2 c - 1 c Heavy Cream or Half and Half
1. Get a large pot of cold Water and set aside. As you peel your Potatoes and dice them, place them in the cold Water. Potatoes will be less mealy if you start them in cold Water.
2. Peel and dice your Potatoes into about 2 inch chunks. Place them into the cold Water off heat.
3. Place the pot of cold Water and Potatoes on the stove and bring to a boil on high heat. Once boiling add 1 T Sea Salt to the pot and stir and reduce the heat to a rolling simmer. Simmer for approximately 15-20 minutes or until the Potatoes are tender and easily pierced with a fork. Remove from the heat and allow the Potatoes to set aside in the hot Water while you heat the Cream.
4. Dice 4 T of cold Butter into small cubes and set aside. In a small pot bring the Cream or Half and Half to a gentle simmer and remove from the heat.
5. Drain the Potatoes well and place through a ricer or food mill or use an old fashioned hand Potato masher and mash the Potatoes then place them back into the original pot off heat.
6. Add the cold Butter and 1 t Sea Salt and 1 t Black Pepper and 1/2 c hot Cream and mix with a large spoon gently. Be careful to avoid over mixing or the Mashed Potatoes will be gummy. Lightly mix until just incorporated. Add more hot Cream if needed in small amounts until you get the desired consistency you prefer. Taste and add more Sea Salt or Black Pepper if needed. Serve immediately with Homemade Gravy or a just a pat of Butter.
Serve your Mashed Potatoes with Butter Roasted Chicken for the perfect compliment or the classic Meatloaf.
COPYRIGHT (c) 2012
Cooking The Amazing is where to go for recipes and cooking techniques for the home cook at all levels of skill. If you love to cook and eat amazing food, you will find recipes that bring out your creative inner chef here.
January 3, 2012
MEATLOAF
Meatloaf is one of those easy to prepare but not so easy to make taste so good recipes. It is usually lacks flavor and is dry and dense, to say the least. We all want easy to prepare recipes that taste Amazing and satisfy everyone in the family. To make this Meatloaf very tasty I've added lots of flavor with savory Thyme, Oregano and sauteed Onions simmered in Worcestershire and traditional Ketchup. A tangy Glaze on top that is lightly sweetened with Brown Sugar tops it, making it even more Amazing. My secret, that I learned after a few dense Meatloafs while I was testing this recipe, is to not pack it in the loaf pan. Meatloaf must be treated gently and it will be light and delicious. None of a good Meatloaf will ever go to waste. I mean, who can resist a cold Meatloaf sandwich slathered with a little extra Ketchup the next day? Nobody can when you are Cooking The Amazing!
Here is the recipe.
1 T Olive Oil
1 T Butter
1 1/2 c Onion, Diced Medium
2 Cloves of Garlic, Finely Chopped
1/2 c Ketchup
1/4 c Worcestershire Sauce
3 T A1 Steak Sauce
3/4 t Fine Grain Sea Salt
1 t Fresh Ground Black Pepper
1 t Cumin
1 1/2 t Dried Thyme
1 t Dried Oregano
1 t Paprika
2 lbs Ground Beef Chuck 80-81% Fat
1/4 lb Ground Mild Italian Sausage
3/4 t Fine Grain Sea Salt
1/2 t Fresh Ground Black Pepper
1/2 c Grated Parmesan Cheese
1 c Crushed Ritz Crackers (20 Crackers)
1/2 c Whole Milk
2 Large Eggs
FOR THE GLAZE:
1 c Ketchup
5 T Dark Brown Sugar
1 T Worcestershire Sauce
1/2 t Fresh Ground Black Pepper
1. Prepare your Meatloaf pan. Use a large loaf pan approximately 8 1/2" x 4 1/2" x 2 3/4" high. Lining the loaf pan with aluminium foil and then make a sling of aluminum foil to lay over the lined part which will help remove your Meatloaf in one piece once cooked. To make a sling tear off about 20 inches of foil and fold it in half long ways and mold it into the prelined pan. Fold the ends down that stick out leaving a handle to use to remove the Meatloaf. Also, line a rimmed baking sheet with aluminum foil to catch all the fat that cooks out. These steps will save you cleaning up a lot of mess because there is a lot of fat that renders as the Meatloaf cooks. If you do not have a loaf pan you can free form the Meatloaf and circle it in a ring of foil to hold it's shape and place it on a lined rimmed baking sheet.
2. Preheat oven to 350 degrees. Prep all of the chopping of the Onions and Garlic and measure all ingredients out and set aside, leaving the meat for last to avoid contamination.
3. In a medium pan over medium heat on the stove, heat Olive Oil and Butter then add diced Onion and Garlic and saute until Onions just begin to soften.
4. Add to the Onion: 1/2 c Ketchup, 1/4 c Worcestershire Sauce, 2 T A1 Steak Sauce, 3/4 t Fine Grain Sea Salt, 1 t Fresh Ground Black Pepper,
1 t Cumin, 1 t Dried Thyme, 1 t Dried Oregano, 1 t Paprika. Stir in well and cook over medium heat for 2 minutes. It will bubble and thicken. Set aside to cool some.
5. Place 20 Ritz Crackers in a zip lock bag and seal it tight with all the air out. Use a rolling pin or a big can and crush the Crackers into fine crumbs. A few big chunks won't hurt anything. Set aside. In a medium bowl (or the measuring cup you use for the Milk), add 2 large Eggs to 1/2 c Milk and mix well with a fork and set aside.
6. In a large mixing bowl add all of the Ground Beef Chuck and Italian Sausage. You want high fat Meats in your Meatloaf to prevent dry Meatloaf. Add the 3/4 t Sea Salt and 1/2 t Black Pepper, 1/2 c grated Parmesan Cheese, crushed Ritz Crackers, Milk and Eggs mixture and the cooked Onion and Ketchup/Worcestershire mixture. Use a large wooden spoon and "cut" across several times mixing everything together. The goal is to not compact the Meat but to keep it "light and fluffy" and not dense. I used to use my hands but I find it compacts the Meatloaf making a hard dense loaf that doesn't have a good mouth feel. After you "cut" across a few times use the wooden spoon and mix everything well, still keeping the Meat "light and fluffy".
7. Once mixed, scoop spoonfuls into the loaf pan gently. Add scoops of the mixture filling the bottom but do not press it into the pan. Lightly tap the mixture into the corners. Once the bottom is covered begin layering the mixture by the spoonful until you have a mound and all the mixture is in the loaf pan. Resist pressing the mixture down with the spoon because this is what makes a dense, tough Meatloaf. Use the back of the spoon to lightly smooth the top and shape it into a loaf shape.
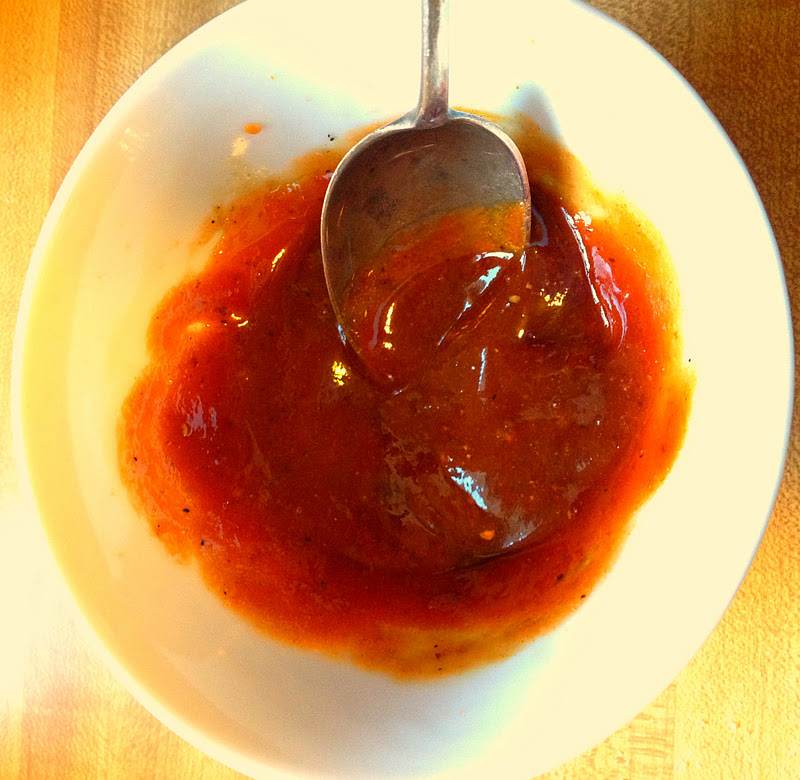
8. In a small bowl make the Glaze by mixing the 1 c Ketchup, 5 T Brown Sugar, 1 T Worcestershire Sauce and 1/2 t fresh ground Black Pepper. Spoon 1/3 of this mixture over the entire top of the Meatloaf. Reserve the other 2/3 for later in the recipe. Place the Meatloaf pan on the lined Cookie sheet and bake for 1 hour 15 minutes at 350 degrees.
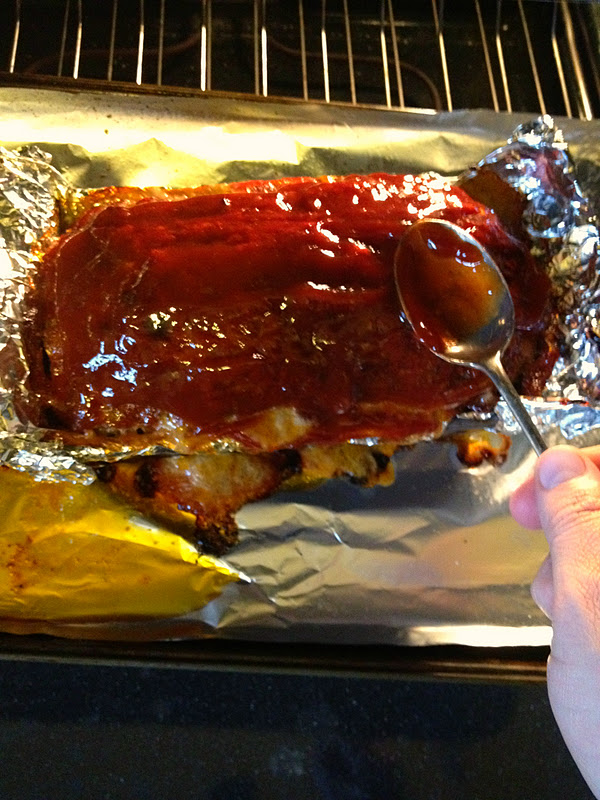
9. After 1 hour and 15 minutes of cooking, spoon and spread another 1/3 of the Glaze over the Meatloaf and return to the oven and cook at 350 degrees for 15 minutes more. You will see all of the fat that has cooked out of the Meatloaf at this point and will be thankful when clean up time comes that you lined everything with foil. Who's got time to scrub pots and pans all day? Not me!
10. After 15 minutes remove from the oven and check the temperature using a Meat thermometer in the center of the Meatloaf. It should register at least 165 degrees when done. If not, place back into the oven at 350 degrees and recheck in 10 minutes or until it is 165 degrees in the center. Once done, let the Meatloaf rest in the pan for 15 minutes on the counter before removing by the aluminum sling and allowing any fat to drain off before serving. While it is resting, microwave the last 1/3 of the glaze for 45-60 seconds on high and use as extra Sauce to spoon on the Meatloaf for those that like more glaze when serving.
COPYRIGHT (c) 2012
Here is the recipe.
1 T Olive Oil
1 T Butter
1 1/2 c Onion, Diced Medium
2 Cloves of Garlic, Finely Chopped
1/2 c Ketchup
1/4 c Worcestershire Sauce
3 T A1 Steak Sauce
3/4 t Fine Grain Sea Salt
1 t Fresh Ground Black Pepper
1 t Cumin
1 1/2 t Dried Thyme
1 t Dried Oregano
1 t Paprika
2 lbs Ground Beef Chuck 80-81% Fat
1/4 lb Ground Mild Italian Sausage
3/4 t Fine Grain Sea Salt
1/2 t Fresh Ground Black Pepper
1/2 c Grated Parmesan Cheese
1 c Crushed Ritz Crackers (20 Crackers)
1/2 c Whole Milk
2 Large Eggs
FOR THE GLAZE:
1 c Ketchup
5 T Dark Brown Sugar
1 T Worcestershire Sauce
1/2 t Fresh Ground Black Pepper
1. Prepare your Meatloaf pan. Use a large loaf pan approximately 8 1/2" x 4 1/2" x 2 3/4" high. Lining the loaf pan with aluminium foil and then make a sling of aluminum foil to lay over the lined part which will help remove your Meatloaf in one piece once cooked. To make a sling tear off about 20 inches of foil and fold it in half long ways and mold it into the prelined pan. Fold the ends down that stick out leaving a handle to use to remove the Meatloaf. Also, line a rimmed baking sheet with aluminum foil to catch all the fat that cooks out. These steps will save you cleaning up a lot of mess because there is a lot of fat that renders as the Meatloaf cooks. If you do not have a loaf pan you can free form the Meatloaf and circle it in a ring of foil to hold it's shape and place it on a lined rimmed baking sheet.
2. Preheat oven to 350 degrees. Prep all of the chopping of the Onions and Garlic and measure all ingredients out and set aside, leaving the meat for last to avoid contamination.
3. In a medium pan over medium heat on the stove, heat Olive Oil and Butter then add diced Onion and Garlic and saute until Onions just begin to soften.
4. Add to the Onion: 1/2 c Ketchup, 1/4 c Worcestershire Sauce, 2 T A1 Steak Sauce, 3/4 t Fine Grain Sea Salt, 1 t Fresh Ground Black Pepper,
1 t Cumin, 1 t Dried Thyme, 1 t Dried Oregano, 1 t Paprika. Stir in well and cook over medium heat for 2 minutes. It will bubble and thicken. Set aside to cool some.
5. Place 20 Ritz Crackers in a zip lock bag and seal it tight with all the air out. Use a rolling pin or a big can and crush the Crackers into fine crumbs. A few big chunks won't hurt anything. Set aside. In a medium bowl (or the measuring cup you use for the Milk), add 2 large Eggs to 1/2 c Milk and mix well with a fork and set aside.
6. In a large mixing bowl add all of the Ground Beef Chuck and Italian Sausage. You want high fat Meats in your Meatloaf to prevent dry Meatloaf. Add the 3/4 t Sea Salt and 1/2 t Black Pepper, 1/2 c grated Parmesan Cheese, crushed Ritz Crackers, Milk and Eggs mixture and the cooked Onion and Ketchup/Worcestershire mixture. Use a large wooden spoon and "cut" across several times mixing everything together. The goal is to not compact the Meat but to keep it "light and fluffy" and not dense. I used to use my hands but I find it compacts the Meatloaf making a hard dense loaf that doesn't have a good mouth feel. After you "cut" across a few times use the wooden spoon and mix everything well, still keeping the Meat "light and fluffy".
7. Once mixed, scoop spoonfuls into the loaf pan gently. Add scoops of the mixture filling the bottom but do not press it into the pan. Lightly tap the mixture into the corners. Once the bottom is covered begin layering the mixture by the spoonful until you have a mound and all the mixture is in the loaf pan. Resist pressing the mixture down with the spoon because this is what makes a dense, tough Meatloaf. Use the back of the spoon to lightly smooth the top and shape it into a loaf shape.
8. In a small bowl make the Glaze by mixing the 1 c Ketchup, 5 T Brown Sugar, 1 T Worcestershire Sauce and 1/2 t fresh ground Black Pepper. Spoon 1/3 of this mixture over the entire top of the Meatloaf. Reserve the other 2/3 for later in the recipe. Place the Meatloaf pan on the lined Cookie sheet and bake for 1 hour 15 minutes at 350 degrees.
9. After 1 hour and 15 minutes of cooking, spoon and spread another 1/3 of the Glaze over the Meatloaf and return to the oven and cook at 350 degrees for 15 minutes more. You will see all of the fat that has cooked out of the Meatloaf at this point and will be thankful when clean up time comes that you lined everything with foil. Who's got time to scrub pots and pans all day? Not me!
10. After 15 minutes remove from the oven and check the temperature using a Meat thermometer in the center of the Meatloaf. It should register at least 165 degrees when done. If not, place back into the oven at 350 degrees and recheck in 10 minutes or until it is 165 degrees in the center. Once done, let the Meatloaf rest in the pan for 15 minutes on the counter before removing by the aluminum sling and allowing any fat to drain off before serving. While it is resting, microwave the last 1/3 of the glaze for 45-60 seconds on high and use as extra Sauce to spoon on the Meatloaf for those that like more glaze when serving.
COPYRIGHT (c) 2012
December 18, 2011
BACON BLUE CHEESE SPIRALS
Bacon is one of those foods many of us can not live without. Bacon is in a class of it's own especially when it is combined with Blue Cheese and Puff Pastry in this easy to prepare appetizer. Serve this delicious and savory appetizer warm or room temperature. It makes a great and unique Salad topping, used much like you would Croutons. Be sure to use a good quality Blue Cheese cut from the wheel and not a prepackaged tub of "crumbles" which will lack taste and make these appetizers boring and nothing like their full potential. Good ones like Maytag, Gorgonzola or Stilton are easy to find these days and worth the search. When you are Cooking The Amazing, something as simple as Bacon and Blue Cheese can come together and be incredible.
Here is the recipe.
3 oz. Blue Cheese (A Good Quality One)
1/4 c Cream Cheese
1/4 c Sour Cream
1/2 t Fresh Ground Black Pepper
10 Strips of Cooked Bacon
1/2 of a 17.3 oz Package of Frozen Puff Pastry
(Like Pepperidge Farm Brand)
1. PLAN AHEAD day before: Allow Puff Pastry to thaw in the refrigerator over night.
2. PLAN AHEAD day of: Allow the Blue Cheese and Cream Cheese to sit out for 2 hours to soften up and make spreading easier. You will be making the filling and spreading it on the Puff Pastry then refrigerating for 3 hours before baking later.
3. Fry 10 strips of good quality Bacon until crisp and place on paper towels to drain. Set aside to cool then crumble and refrigerate while Blue Cheese softens.
4. Once your Blue Cheese and Cream Cheese has softened add them to a medium bowl and break it up using a fork or your fingers.
5. Add Sour Cream, Black Pepper and Bacon crumbles and mix well with a spoon. It will be thick. Set aside.
6. Dust a board or work surface with a little flour to keep the Puff Pastry from sticking. Use only one of Puff Pastry sheets that come in a package for this recipe. Roll it out slightly using a rolling pin.
7. Spread the Blue Cheese mixture evenly almost to the edges of the Puff Pastry.
8. From the widest end start rolling the Puff Pastry to the middle then roll the other side to meet it in the middle. Wrap tight in plastic wrap and refrigerate for 3 hours minimum and up to over night if needed.
9. After chilling, preheat oven to 375 degrees. Place a parchment sheet or spray a Cookie Sheet with Vegetable Spray (Like Pam) and set aside.
10. Remove from the refrigerator and cut the two rolls in half. Then cut each roll into 1/2 inch wide spirals and place on the Cookie sheet.
11. Bake at 375 degrees for 18-20 minutes or until the Puff Pastry if puffed and just starts to brown. Over cooking will make the Cheese filling run out and burn. Remove them before they look "done" and look a little under baked. Sever warm or at room temperature.
Other great appetizers that you could serve along side these are Ham And Cream Cheese Appetizers or
Copyright (c) 2011
Here is the recipe.
3 oz. Blue Cheese (A Good Quality One)
1/4 c Cream Cheese
1/4 c Sour Cream
1/2 t Fresh Ground Black Pepper
10 Strips of Cooked Bacon
1/2 of a 17.3 oz Package of Frozen Puff Pastry
(Like Pepperidge Farm Brand)
1. PLAN AHEAD day before: Allow Puff Pastry to thaw in the refrigerator over night.
2. PLAN AHEAD day of: Allow the Blue Cheese and Cream Cheese to sit out for 2 hours to soften up and make spreading easier. You will be making the filling and spreading it on the Puff Pastry then refrigerating for 3 hours before baking later.
3. Fry 10 strips of good quality Bacon until crisp and place on paper towels to drain. Set aside to cool then crumble and refrigerate while Blue Cheese softens.
4. Once your Blue Cheese and Cream Cheese has softened add them to a medium bowl and break it up using a fork or your fingers.
5. Add Sour Cream, Black Pepper and Bacon crumbles and mix well with a spoon. It will be thick. Set aside.
6. Dust a board or work surface with a little flour to keep the Puff Pastry from sticking. Use only one of Puff Pastry sheets that come in a package for this recipe. Roll it out slightly using a rolling pin.
7. Spread the Blue Cheese mixture evenly almost to the edges of the Puff Pastry.
8. From the widest end start rolling the Puff Pastry to the middle then roll the other side to meet it in the middle. Wrap tight in plastic wrap and refrigerate for 3 hours minimum and up to over night if needed.
9. After chilling, preheat oven to 375 degrees. Place a parchment sheet or spray a Cookie Sheet with Vegetable Spray (Like Pam) and set aside.
10. Remove from the refrigerator and cut the two rolls in half. Then cut each roll into 1/2 inch wide spirals and place on the Cookie sheet.
11. Bake at 375 degrees for 18-20 minutes or until the Puff Pastry if puffed and just starts to brown. Over cooking will make the Cheese filling run out and burn. Remove them before they look "done" and look a little under baked. Sever warm or at room temperature.
Other great appetizers that you could serve along side these are Ham And Cream Cheese Appetizers or
easy to prepare Stuffed Mushrooms.
Copyright (c) 2011
December 3, 2011
CHICKEN STOCK
We have all used canned Chicken Broth and have had great successes in our cooking. I use the boxes of Broth and can turn out delicious results, but when I use homemade Chicken Stock it elevates the flavors dramatically of whatever I am cooking. Soups with homemade Stock are incredible when you make the effort. Like my Roasted Butternut Squash Soup. The truth is Chicken Stock is easy to make, but it is time consuming regardless of what the cookbooks say. Prep time is not much, maybe 20 minutes, but you will be baby sitting the Chicken Stock for 5 hours as it simmers. It's best to make it in the morning of a day you will be home all day. It is all worth it in the end when you are Cooking The Amazing and make everything taste so much better.
Here is the recipe.
8 Quarts Cold Filtered Water
4 1/2 lbs. Chicken Parts With Bones
2 Large Onions, Quartered
4 Medium Carrots, Peeled and Large Chopped
4 Stalks Celery, Large Chopped
3 Whole Cloves Garlic Peeled
1/2 t Whole Black Pepper Corns
2 Bay Leaves
2 t Fine Grain Sea Salt
2 t Dried Thyme
10 Fresh Flat Leaf Parsley Sprigs
2 Roma Tomatoes Quartered
1. Prep all of your Vegetables before you touch the raw Chicken to keep from spreading bacteria. Peel the Carrots, Onions and Garlic. Rough chop the Carrots and Celery in 3 inch pieces. Cut the Carrot pieces in half. Quarter the peeled Onions and peel the Garlic leaving the Cloves whole. Cut the Tomatoes in quarters leaving skin on. Set aside with all the other ingredients except the Chicken.
2. Use a very large Stock pot. I use a 12 quart. Fill it with 8 quarts of cold filtered Water. Bad tasting Water gives you an odd tasting Stock. Starting your Stock in cold Water is important to develop the collagen (the jelly stuff in good Stock) which provides body to the Stock.
3. Wash your Raw Chicken well under cold Water in the sink. I use chopped Chicken parts from the butcher or prepackaged cut up whole Chickens in the Meat section of the market. Be sure you have bone in and skin on Chicken. Legs, thighs, backs, and wings are the best parts to use. Don't use giblets. Once washed place the Chicken parts in the cold Water in the Stock pot.
4. Add all the prepped Veg and Black Pepper Corns, Bay Leaves, Sea Salt, Thyme and Parsley to the Stock pot and make sure all is covered in Water. Turn the burner to high and bring to a rolling simmer. Do not boil. Once at a rolling simmer reduce heat to low medium to a gentle slow simmer. Do not cover and allow to simmer for 5 hours. Every hour use a skimmer and remove any floating white-gray scum and discard it. Do not stir the Stock as it simmers but keep all the ingredients submerged as much as possible.
5. After 5 hours, turn off the heat. Skim any scum off the top and discard. Remove all the Meat and Veg as much as possible with tongs or a big slotted spoon and strain what is left through a fine mesh strainer or Cheese cloth for the clearest, purest Stock. I use only a fine mesh strainer for my style of rustic home cooking. Your Chicken Stock is now ready to use. Or if you want to freeze it or use it tomorrow allow the Chicken Stock to sit for 1 hour at room temperature and then refrigerate. Store in air tight freezer containers. Freeze for up to 3 months in a sealed container or refrigerate and use over the next 2 days. If I am making Chicken Noodle Soup or a Cream Soup like Cream of Potato I use it right after straining. I don't remove the fat. A lot of flavor is in that fat. This Chicken Stock is purposefully under seasoned with Salt because when you use it in your final recipe you will adjust the Salt for that particular recipe. This yields 6-7 quarts of prepared Chicken Stock.
*Try this delicious Chicken Stock in my recipe for Roasted Butternut Squash Soup.
COPYRIGHT (c) 2011
Here is the recipe.
8 Quarts Cold Filtered Water
4 1/2 lbs. Chicken Parts With Bones
2 Large Onions, Quartered
4 Medium Carrots, Peeled and Large Chopped
4 Stalks Celery, Large Chopped
3 Whole Cloves Garlic Peeled
1/2 t Whole Black Pepper Corns
2 Bay Leaves
2 t Fine Grain Sea Salt
2 t Dried Thyme
10 Fresh Flat Leaf Parsley Sprigs
2 Roma Tomatoes Quartered
1. Prep all of your Vegetables before you touch the raw Chicken to keep from spreading bacteria. Peel the Carrots, Onions and Garlic. Rough chop the Carrots and Celery in 3 inch pieces. Cut the Carrot pieces in half. Quarter the peeled Onions and peel the Garlic leaving the Cloves whole. Cut the Tomatoes in quarters leaving skin on. Set aside with all the other ingredients except the Chicken.
2. Use a very large Stock pot. I use a 12 quart. Fill it with 8 quarts of cold filtered Water. Bad tasting Water gives you an odd tasting Stock. Starting your Stock in cold Water is important to develop the collagen (the jelly stuff in good Stock) which provides body to the Stock.
3. Wash your Raw Chicken well under cold Water in the sink. I use chopped Chicken parts from the butcher or prepackaged cut up whole Chickens in the Meat section of the market. Be sure you have bone in and skin on Chicken. Legs, thighs, backs, and wings are the best parts to use. Don't use giblets. Once washed place the Chicken parts in the cold Water in the Stock pot.
4. Add all the prepped Veg and Black Pepper Corns, Bay Leaves, Sea Salt, Thyme and Parsley to the Stock pot and make sure all is covered in Water. Turn the burner to high and bring to a rolling simmer. Do not boil. Once at a rolling simmer reduce heat to low medium to a gentle slow simmer. Do not cover and allow to simmer for 5 hours. Every hour use a skimmer and remove any floating white-gray scum and discard it. Do not stir the Stock as it simmers but keep all the ingredients submerged as much as possible.
5. After 5 hours, turn off the heat. Skim any scum off the top and discard. Remove all the Meat and Veg as much as possible with tongs or a big slotted spoon and strain what is left through a fine mesh strainer or Cheese cloth for the clearest, purest Stock. I use only a fine mesh strainer for my style of rustic home cooking. Your Chicken Stock is now ready to use. Or if you want to freeze it or use it tomorrow allow the Chicken Stock to sit for 1 hour at room temperature and then refrigerate. Store in air tight freezer containers. Freeze for up to 3 months in a sealed container or refrigerate and use over the next 2 days. If I am making Chicken Noodle Soup or a Cream Soup like Cream of Potato I use it right after straining. I don't remove the fat. A lot of flavor is in that fat. This Chicken Stock is purposefully under seasoned with Salt because when you use it in your final recipe you will adjust the Salt for that particular recipe. This yields 6-7 quarts of prepared Chicken Stock.
*Try this delicious Chicken Stock in my recipe for Roasted Butternut Squash Soup.
COPYRIGHT (c) 2011
ROASTED CABBAGE
No more gray over boiled Vegetables that taste just like they look...nasty. I have really come to love roasting Veg because it is easy and brings out the Amazing caramelized flavor that boiling can not. When you roast Cabbage the natural sweetness prevails and all you taste is deliciousness. Roasted Cabbage makes a great side dish to Pork Chops, Maple Cherry Glazed Ham or Butter Roasted Chicken. It is healthy and delicious and so easy to make. When you are Cooking The Amazing eating your daily Veg is easy and when you are roasting Cabbage for dinner.
Here is the recipe.
1 Large Head of Cabbage
2 T Olive Oil
Fine Grain Sea Salt
Fresh Ground Black Pepper
3 T Butter, Softened
1. Preheat oven to 400 degrees. Line a baking sheet with aluminum foil to make clean up easy. You will thank me later.
2. Remove the bruised and dry outer leaves of a head of Cabbage. Cut the head into 6-8 equal wedges leaving the core and stem in place which will hold the leaves together. Trim the stem with a paring knife. You can use Green Cabbage or Red Cabbage or Napa Cabbage.
3. Drizzle the Cabbage wedges with Olive Oil and rub it all over the surface using your hands. Sprinkle Sea Salt and Black Pepper over both sides.
4. Bake at 400 degrees for 35-45 on the center rack of your oven turning over with a spatula half way through roasting. It is done when edges are browned and it is fork tender. Napa cabbage will cook faster so check it at 30 minutes. When roasted and done spread softened Butter over hot Cabbage and serve immediately.
COPYRIGHT (c) 2011
Here is the recipe.
1 Large Head of Cabbage
2 T Olive Oil
Fine Grain Sea Salt
Fresh Ground Black Pepper
3 T Butter, Softened
1. Preheat oven to 400 degrees. Line a baking sheet with aluminum foil to make clean up easy. You will thank me later.
2. Remove the bruised and dry outer leaves of a head of Cabbage. Cut the head into 6-8 equal wedges leaving the core and stem in place which will hold the leaves together. Trim the stem with a paring knife. You can use Green Cabbage or Red Cabbage or Napa Cabbage.
3. Drizzle the Cabbage wedges with Olive Oil and rub it all over the surface using your hands. Sprinkle Sea Salt and Black Pepper over both sides.
4. Bake at 400 degrees for 35-45 on the center rack of your oven turning over with a spatula half way through roasting. It is done when edges are browned and it is fork tender. Napa cabbage will cook faster so check it at 30 minutes. When roasted and done spread softened Butter over hot Cabbage and serve immediately.
COPYRIGHT (c) 2011
HOT CHOCOLATE
A cup of steaming Hot Chocolate can literally warm your insides on a cold winter's day. Coming inside from the blowing wet snow to a warm fire and cup of creamy Hot Chocolate sounds romantic and can be easily achieved in less than five minutes (assuming you have a gas fireplace that turns on with a switch.) I'm talking about real Hot Chocolate. The kind that is made from real Chocolate with rich Half and Half and Cocoa to deepen the Chocolate flavor. You can up the flavor by adding Peppermint Extract or serve Hot Chocolate over a scoop of cold Vanilla Ice Cream as a dessert. When you are Cooking The Amazing Hot Chocolate is as Amazing as it can get.
Here is the recipe for 1 serving.
1 c Half and Half
1 T Dutch Processed Cocoa
3 T Sugar
1 t Vanilla Extract
1/4 t Ground Cinnamon
1/4 c Semi Sweet Chocolate Chips
Whipped Cream Or Marshmallows To Top
1. This recipe is per serving. So, double or triple it, etc. as needed.
2. In a pot over medium heat bring Half and Half just to a simmer. Stir in Cocoa, Sugar, Vanilla Extract and Cinnamon. Allow to simmer for 1 minute constantly stirring.
3. Pour 1/4 c of Semi Sweet Chocolate Chips into bottom of a large mug. Use good Chocolate like Ghirardelli brand. I use Ghirardelli 60% Cocao Bittersweet Chips found at most markets.
4. Pour the hot Milk mixture over the Chocolate Chips and stir until the Chocolate Chips have melted and are well mixed into the hot Milk mixture.
5. Top with Whipped Cream or Marshmallows and serve immediately.
TIP: Add 1/2 t of Peppermint Extract for Hot Mint Chocolate.
COPYRIGHT (c) 2011
Here is the recipe for 1 serving.
1 c Half and Half
1 T Dutch Processed Cocoa
3 T Sugar
1 t Vanilla Extract
1/4 t Ground Cinnamon
1/4 c Semi Sweet Chocolate Chips
Whipped Cream Or Marshmallows To Top
1. This recipe is per serving. So, double or triple it, etc. as needed.
2. In a pot over medium heat bring Half and Half just to a simmer. Stir in Cocoa, Sugar, Vanilla Extract and Cinnamon. Allow to simmer for 1 minute constantly stirring.
3. Pour 1/4 c of Semi Sweet Chocolate Chips into bottom of a large mug. Use good Chocolate like Ghirardelli brand. I use Ghirardelli 60% Cocao Bittersweet Chips found at most markets.
4. Pour the hot Milk mixture over the Chocolate Chips and stir until the Chocolate Chips have melted and are well mixed into the hot Milk mixture.
5. Top with Whipped Cream or Marshmallows and serve immediately.
TIP: Add 1/2 t of Peppermint Extract for Hot Mint Chocolate.
COPYRIGHT (c) 2011
Subscribe to:
Posts (Atom)