Showing posts with label sweets. Show all posts

April 28, 2012

APPLE COBBLER


Who doesn't love Apple Cobbler?  Especially if it is served warm with Vanilla Ice Cream on top.  Apple Cobbler is a dessert that many people make in the autumn when the Apple harvest is at its peak.  Of course, Apples can be bought year round from any market so no matter what time of year you can make Apple Cobbler.  This recipe can be made with any good cooking Apple that holds its shape and packs a lot of flavor.   Golden Delicious, Granny Smith and Cortland are just a few of the great tasting Apples that would work excellent in this recipe.   When you are Cooking The Amazing an Apple a day just might happen to be in the form of a Cobbler.


Here is the recipe.


7  Medium Apples (Golden Delicious, Cortland, etc.)
1 c  Dark Brown Sugar Packed
1 t  Ground Cinnamon
1/4 t  Ground Nutmeg
1  1/2 t  Vanilla Extract
1  1/4 c  All Purpose Flour
3/4 c  Sugar
Small Pinch Of Sea Salt
1 1/2 t  Baking Soda
2 t  Vanilla Extract
1 c  Whole Milk
1 Stick  Butter, Melted


1.  Preheat the oven to 350 degrees.  Peel and core Apples and slice into large slices placing them into a large bowl.
2.  Add 1 c packed Dark Brown Sugar, Cinnamon, Nutmeg and 1 1/2 t Vanilla Extract and mix with the Apples until well combined.  Set aside and allow the natural Juices to develop.
3.  In another medium bowl add the All Purpose Flour, Sugar, very small pinch of Sea Salt and mix well with a spoon.  Then add the Milk and 2 t of Vanilla Extract and mix until smooth.  Set aside.

4.  In a large pan over medium heat on the stove top simmer all the Apples and Brown Sugar mixture with any Juices that developed for 6-7 minutes, until the Apples begin to shrink and get soft.  Remove from the heat and set aside.
5.  Microwave 1 stick of Butter in a microwave proof bowl.  Divide it in half and pour half into the bottom of a 9 x 13 baking dish.  Reserve the other 1/2 for the last step.
6.  Pour the Batter you made gently over the melted Butter in the baking dish.  DO NOT MIX together.
7.  Spoon the cooked Apples over the Batter in the baking dish gently, distributing them evenly.  Then drizzle all of the Syrup left in the pan evenly over the Apples.
8.  Drizzle the reserved 1/2 stick of melted Butter over the top of everything evenly. 
9.  Place the baking dish on a Cookie Sheet for safe and easy transport to and from the oven.  Bake for 45-50 minutes at 350 degrees until the top is evenly browned.  Allow to rest for 30 minutes to set up.  Serve warm topped with Vanilla Ice Cream or with my recipe for perfect Whipped Cream.


COPYRIGHT (c) 2012

September 1, 2011

MAPLE NUT GRANOLA


I can remember the first time as a kid eating Granola Cereal for breakfast. It seemed very "hippy" but I guess I was sort of a hippy kid with my long hair and living in the early 70's.  It's still a breakfast Cereal but it is also versatile enough to use as a topping for Vanilla Ice Cream or Yogurt.  When added to Pancake Batter or Muffin Batter before baking makes them more Amazing and gives a sweet crunch.  I wanted my Granola to be sweet and have lots of warm flavors like Cinnamon and Maple Syrup to round it out.  I added three kinds of Nuts and Coconut to give it crunch and real depth of flavor. Other great ways to use Granola is to sprinkle it over fresh Fruit like Apples, Plums, or Bananas or you can easily pack it in your work lunch to get you through the day when mid afternoon hunger strikes.  Granola has come a long way since the 70's and when you are Cooking The Amazing it can be easy and delicious.


Here is the recipe.


5 c  Rolled Oats
1 c  Chopped Walnuts
1 c  Chopped Pecans
1 c  Chopped Almonds
2 c  Sweetened Coconut Flakes
1 c  Roasted Sunflower Seeds
1 c  Raisins or Dried Blueberries
1 c  Dried Cranberries or Cherries
1 c  Dark Brown Sugar
1 t  Ground Cinnamon
1/2 t  Sea Salt, fine grain
1 c  Maple Syrup
1/2 c  Honey
1/2 c  Canola Oil
1 t  Vanilla Extract


1. Preheat oven to 325 degrees.  Cover a cookie sheet pan with aluminium foil to make clean up easy.


2. Place 5 c of Rolled Oats in a large bowl.  Rolled Oats are also called Old Fashioned Oats. Do not use Instant Oats but Steel Oats will work, too.


3. Chop all the nuts into small pieces. Small enough to eat easily. Place in the bowl with the Oats. Add the Cinnamon, Salt, Coconut, Roasted Sunflower Seeds, Raisins and Cranberries and mix well with a large spoons or your hands.


4. In a medium bowl mix together with a spoon the Maple Syrup, Honey, Canola Oil, and Vanilla Extract well.


5. Pour the liquid mixture over the Oat mixture and mix well with a large spoon or your hands.  I use my hands which works best.  Be sure to get all of the dry ingredients covered with the wet ingredients.


6. Spread the 1/2 of the mixture in an even
Layer on the covered cookie sheet and place on the middle rack of a 325 degree preheated oven and bake for 22-25 minutes or until the Granola is browned. This will make enough for two batches.


7. Remove from the oven and let sit on the pan until cool before breaking up into chunks as big or as small as you like. When you first remove the Granola from the oven the Granola will still be wet and will feel crumbly.  It's the browned color you are looking for to ensure doneness.  When it gets toasty brown it is done.  Once it sits for about 1 hour it will dry out and cool.  Once cooled completely store in an air tight container.


Granola makes a great Cereal with Milk or Soy Milk.

Or cover your favorite Yogurt with a handful of Granola.

COPYRIGHT (c) 2011


August 1, 2011

BANANA BREAD MUFFINS


Banana Bread is an American favorite that can not be matched for the Amazing aroma that comes from the kitchen while it bakes.  Making Banana Bread into Muffins makes it practical to place in a school or office brown bag lunch or to use as individual desserts.  For the most amazing dessert bake these Banana Bread Muffins and place a scoop of high quality Vanilla Ice Cream in the center of a Muffin cut into quarters and then top with Banana Pineapple Foster Sauce.  I know, my butt is already too big, too, but this is an amazing dessert and you deserve to splurge once in a while.  Big butt or not, when something tastes this good it is worth Cooking The Amazing for.


Here is the recipe.


2  Sticks Butter Softened
1 1/2 c   Sugar
1 c  Dark Brown Sugar
2  Large Eggs
1 c  Whole Milk
1/2 c  Sour Cream
2 t  Vanilla Extract
1 t  Almond Extract
6  Over Ripened Medium Bananas
4 c  All Purpose Flour
1 1/2 t  Baking Soda
1 1/2 t Baking Powder
3/4 t  Fine Grain Sea Salt
1  1/4 t  Ground Cinnamon
1/8 t  Ground Ginger
12 oz  Toasted Black Walnut Pieces
           or Toasted Pecan Pieces
1 c  Dark Brown Sugar (for tops)
OPTIONAL:  1 1/2 c  Dark Chocolate Chips


1.  Prepare ahead and use very ripe and black spotted Bananas, the kind that fruit flies swarm and allow the Butter and Eggs to come to room temperature.  Preheat oven to 375 degrees and prepare Muffin pans with Cupcake papers.  This makes about 20-22 large Muffins or 30 regular sized Muffins.

2.  In a large mixing bowl with a hand held mixer or the bowl of a KitchenAid Mixer using the paddle attachment cream the Butter, Sugar and 1 c Dark Brown Sugar for 4 minutes.  It will look grainy. 
3.  To this bowl, add the 2 Eggs, Milk, Sour Cream, Vanilla and Almond Extracts and mix until well incorporated, about 2 minutes.
4.  In a separate bowl, using a hand mixer, mix the Bananas until uniform and mushy, about 2 minutes.

5.  Add the Bananas to the other bowl and mix well into the mixture.
6. In a large bowl using a rubber spatula, mix well the Flour, Baking Soda, Baking Powder, Sea Salt, Cinnamon and Ground Ginger.  Then sift this mixture over the wet ingredients.  Mix for about 1 minute using a hand mixer.
                                         
TIP:  To toast the Walnut pieces (or Pecan pieces) place in a dry skillet over medium heat on the stove top and stir very frequently until the begin to brown and become fragrant.  Watch very closely because they can burn quickly.

7.  Add the Toasted Walnut Pieces or Pecans and fold in well.  If you are adding the optional Dark Chocolate Chips, add them now.  I recommend Ghirardelli 60% Cocoa Bittersweet Chocolate Chips because they taste Amazing and are affordable.  Of course, if you have a block of Valrhona Chocolate around use it chopped into chunks.  No one will complain.


8.  Fill the Muffin cups 3/4 full and then sprinkle the tops with 1 c Dark Brown Sugar evenly divided and place in a preheated 375 degree oven on center rack. Rotate the pans 1/2 way through cooking time.  For large Muffins bake for 24-30 minutes or until the tops are browned and a tooth picks come out clean.  For regular sized Muffins bake for 20-25 minutes.  For traditional Banana Bread loaves, divide into two large loaf pans and bake for 40-50 minutes until a toothpick comes out clean and tops are evenly browned.  Your house will smell AMAZING while this bakes.  Allow to cool in the pan.

TIP:  For an even bigger butt:  Make a layered dessert by slicing Banana Bread Muffins and layering them with Grandma's Banana Pudding Recipe and topping with Homemade Whipped Cream for another delicious end to a meal.

March 1, 2011

FRENCH TOAST

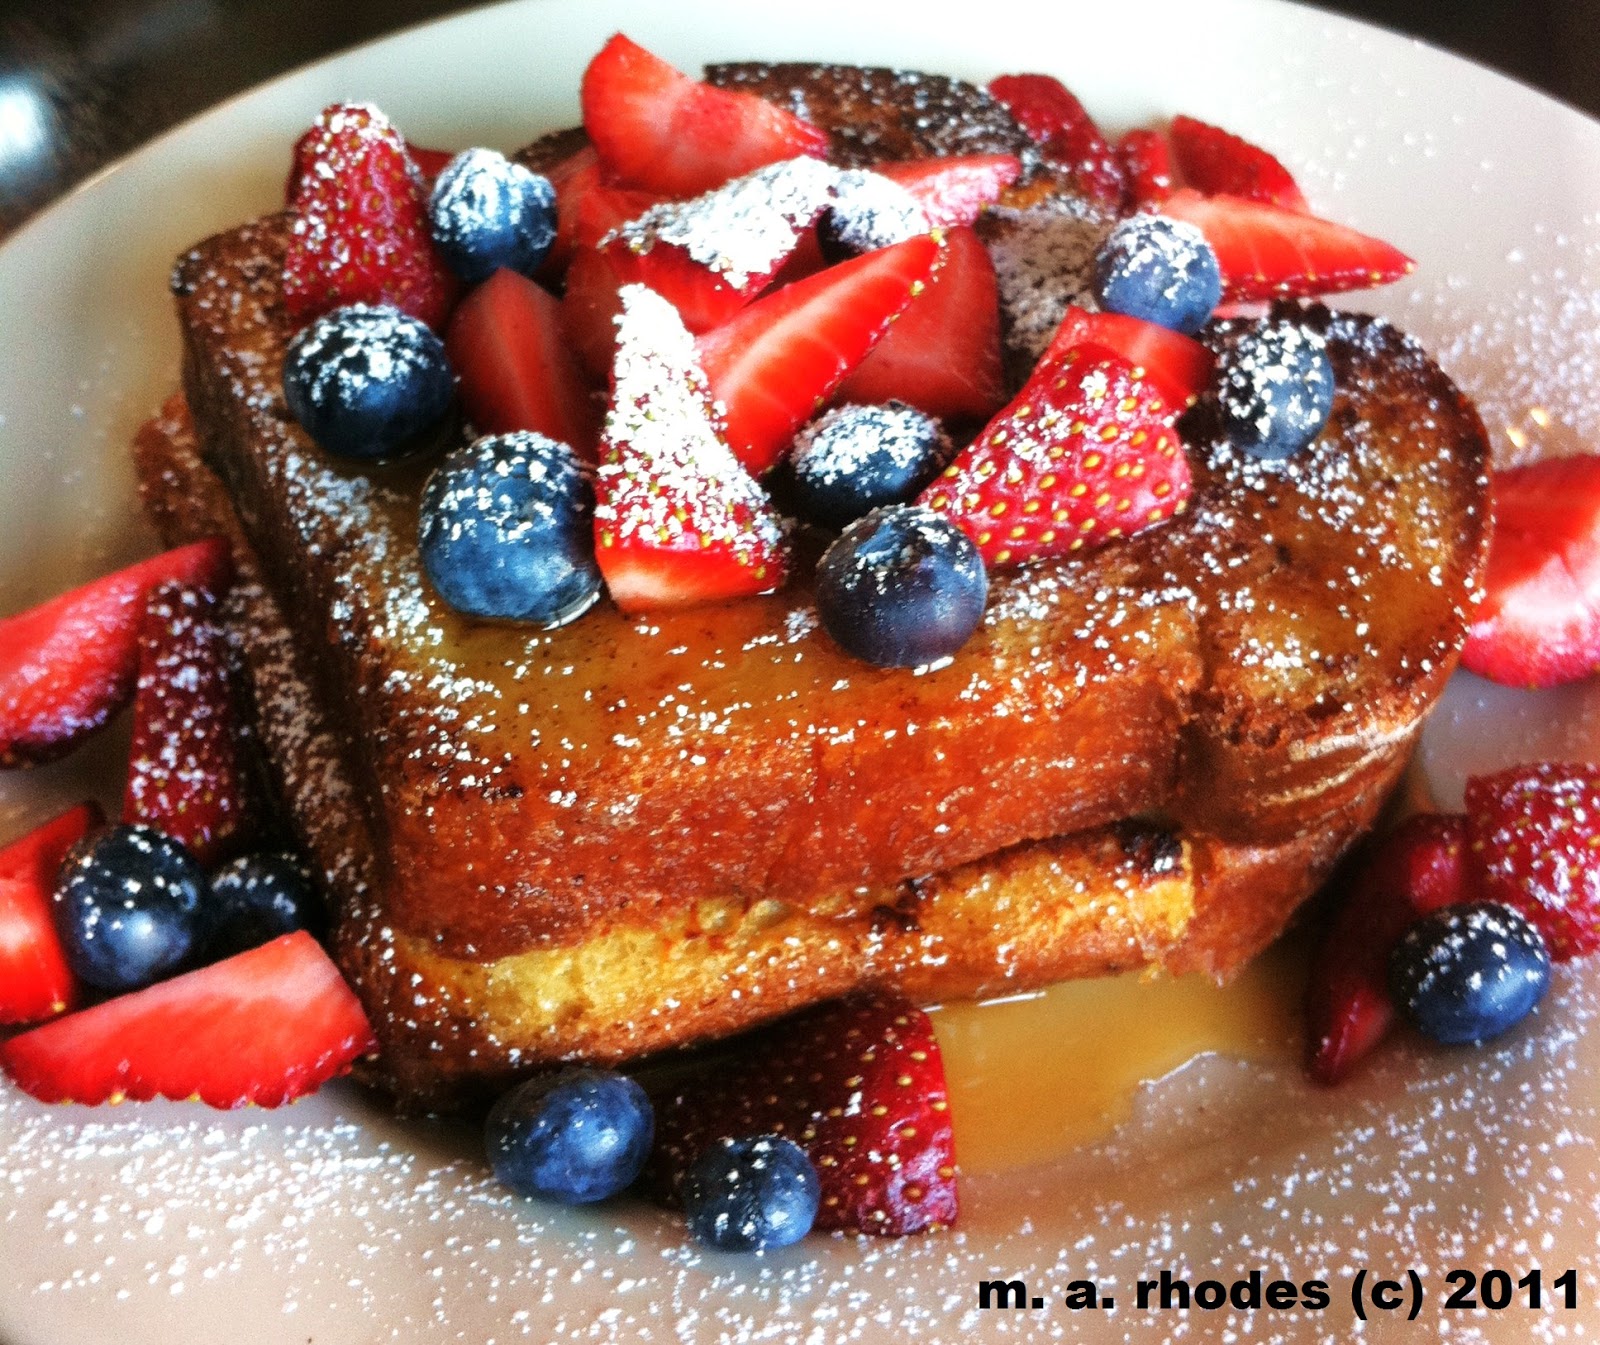
It's usually only on Sunday mornings, special Sunday's at that, that we eat French Toast at my house.  But, lately with all this Brioche Bread making going on, it's been a Sunday French Toast breakfast even on a regular Wednesday.  The above picture is from yesterday's breakfast of amazing Brioche French Toast with a hint of Cinnamon and sweet Brown Sugar with thick Maple Syrup and fresh Berries.  You can use any great tasting Bread for French Toast but Brioche really makes the best.  For a special breakfast, like a birthday or Mum's Day, you could even make French Toast even more amazing by topping it with Banana Pineapple Foster Sauce.   This would be for someone very special indeed!   No matter how you choose to top it, Toasted Pecans and Maple Syrup, Bacon and Maple Syrup or just a dash of Powdered Sugar, French Toast is an all time favorite when you are Cooking The Amazing.


Here is the Recipe.


6  Thick Slices of Bread (preferably Brioche)
3 T  Butter
1 c  Half and Half
2  Large Eggs
1/4 c  Dark Brown Sugar
1/2 t  Ground Cinnamon
1 t  Vanilla Extract
Pinch of Sea Salt, fine grain
Optional Toppings


1.  If you have a whole loaf of Bread , slice your Bread into thick 1 inch slices.  The best Bread for French Toast is Brioche.  You can make it using my recipe HERE or buy a good quality one.  Any good Bread will work well for French Toast.  Challah, French Bread or Sour Dough also make amazing French Toast.
2.  In a shallow dish whisk the Half and Half, Eggs, Brown Sugar, Cinnamon, Vanilla and Sea Salt well.  Heat a medium pan over medium heat and Melt 3 T of Butter in it.


3.  Place your Bread into the Half and Half mixture and allow to soak for 30 secs. then flip to the other side and soak for 30 secs. as your pan heats up.
4.  Place into the pan of melted Butter and cook on both sides for 2-4 minutes on each side until well browned.
5.  Once browned remove to platter or plate and top with your favorite toppings and serve immediately.
6.  Some amazing toppings to try:  Mixed Berries, Hot Maple Syrup over Fried Bacon,  Whipped Cream and fresh Bananas, Blueberry or Strawberry Jam,  Applesauce and Cinnamon or Mascarpone Cheese and Fresh Cherries.  

Banana Pineapple Foster Sauce on top of this French Toast would be the ultimate!


COPYRIGHT (c) 2011

February 11, 2011

RED VELVET CAKE


Want the perfect Valentine's Day dessert?  Or just a fun dessert for any time of the year.  Red Velvet Cake is an old fashioned Southern classic that has become the most popular Cake at bakeries across America.   It is know for it's vibrant bright red Cake and creamy Cream Cheese Icing, although there is much debate on what the original Icing should be.  You can easily use Vanilla Butter Cream Icing to top this moist Cake.   Original recipes also contained a small amount of Cocoa Powder and Vinegar.  In my recipe testing I found that neither one made a difference so I left them out of my recipe.   I also made mine more flavorful using more Extracts.   If you have a Sweetie that has a sweet tooth you can make them Red Velvet Cupcakes and swoon them all over again when you are Cooking The Amazing.


Here is the recipe.


1 1/2 Sticks Butter, unsalted, softened
1  3/4 c  Sugar
6  Egg Whites, From Large Eggs
1/4 t  Cream Of Tartar
1 c  Buttermilk
1/2 c  Sour Cream
1 T  Vanilla Extract
3 t  Almond Extract
1 oz  Liquid Red Food Coloring
2 1/2 c  Cake Flour (You may substitute All Purpose Flour but will be slightly more dense)
2 t  Baking Powder
2 t  Baking Soda
1 t  Sea Salt, fine grain


1.  Preheat your oven to 350 degrees.  Make sure you aren't wearing white clothes or any special clothes that you don't want to get Red Food Coloring on.  Prepare ahead:  Allow your Eggs and Butter to sit out at room tempertaure for a more fluffy Cake.

2.  Grease with Butter or spray with Pam, 3 Cake pans 8 inches round or fill 20 large Cupcake liners into Muffin tins.  Or 24-26 small Cupcake liners.  Line the Cake pans with parchment rounds or wax paper wounds on the bottom of the pans to ensure easy removal once baked.

3.  In the bowl of a stand mixer fitted with the whisk attachment or a large bowl with a hand mixer, place six room temperature Egg Whites and 1/4 t  Cream of Tartar and beat until you get stiff peaks.  Remove them from the bowl and set aside for later.  I don't even wipe out the bowl and continue on with the next step.  It all ends up in the cake anyway.

4.  In the bowl of a stand mixer with paddle attachment (switch out the whisk) or a large bowl with a hand mixer, beat the Butter for 2 minutes then add the Sugar and beat for 2 minutes more.


5.  Add the Buttermilk, Sour Cream, Vanilla Extract and the Almond Extract and mix for approx 2 mins.   It will look curdled.  Scrape down the bowl to be sure to get it well mixed with a rubber spatula.

6.  Then add the Red Food Coloring.   Mix it on low to prevent it flying out and staining you and your kitchen!
7.  In a large bowl mix all the dry ingredients using a whisk so that it is well incorporated.
8.  Slowly add the dry ingredients by sifting them over the wet ingredients then mix on low speed for a few seconds so the flour doesn't make a dust cloud in your face (I've done it a million times!) and then increase speed to medium for 2 minutes.  Scrape down the bowl half way through mixing.  Next fold in all of the Egg Whites until well incorporated using a rubber spatula.  Then divide Cake Batter between prepared cake pans or scoop into Cupcake Liners.

9.  For Cupcakes:  Using an Ice Cream scoop or large spoon fill Cupcake liners 1/2 way.  Do not fill higher or it will overflow during baking.
For Layer Cake:  Pour 1/3rd of the Batter into each prepared Cake pan. 

10.  Bake Cupcakes at 350 degrees in the center of the oven for 22-25 minutes.  Bake Cakes at 350 degrees for 25-30 minutes. 
The top center may look wet even though they are done.  Test using a toothpick.  If it comes out clean it is done.   Allow to cool in the pans for 1-2 hrs until completely cool before icing with your favorite Icing.


CREAM CHEESE ICING


2  Sticks Butter, unsalted, softened
16 oz.  Cream Cheese (2 bars) softened
3 c  Powdered Sugar
4 t  Vanilla Extract
1/4 t  Almond Extract
Pinch Sea Salt, fine grain (small pinch)


Total Prep Time: 7 minutes (except time to soften butter and cream cheese.)


1.  Allow Butter and Cream Cheese to sit out until at room temperature and softened.


2.  In a large bowl, place the softened Butter.


3.  Cream the Butter with a hand mixer for 2 minutes. Then add the Cream Cheese and cream for 2 minutes or so more until well mixed.


4.  1 cup at a time, add the Powdered Sugar and blend well.


5.  Add Salt, Vanilla and Almond Extracts and mix well.


6.  Keep Cream Cheese Icing at room temperature for the best consistency to ice cakes.


7.  Refrigerate unused icing. To use again, bring to room temperature then mix with a hand mixer for about 1 minute before using.


OPTION: For those that like a very strong Cream Cheese taste add another 4 oz. of Cream Cheese for a more intense flavor.


COPYRIGHT (c) 2011