January 27, 2011

CREAM PUFFS

                                                     
I live in dairy country where dairy farms are literally in my back yard.  Wisconsin is all things dairy and the Cream Puff could probably be called the state Dessert.  The Wisconsin State Fair has been famous for their Cream Puffs since 1924, selling about 35,000 Cream Puffs each day of the State Fair.  Cream Puffs were first introduced to showcase the amazing Dairy bounty found on the dairy farms of our state.  You don't have to be from Wisconsin to enjoy the delicate French Pastry (Pate A Choux) that surrounds Sugary clouds of fresh, sweet  Whipped Cream.  You just have to be Cooking The Amazing!  


Here is the recipe.


1  recipe of Pate A Choux
2  recipes of Whipped Cream
1/2 c  Powdered Sugar


1.  First you must make a batch of Pate A Choux.  Click here for the recipe.                         
2.  Allow the Pate A Choux to cool completely on a wire rack.   Once cooled, split the Pastry in half across the middle.

3.  Make the Whipped Cream just before serving for best flavor.  Remember to double the recipe for a generously filled Cream Puff.  Spoon large dollops of the Whipped Cream on the bottom half of the Pastry and top it with the top half of the Pastry.  Dust with Powdered Sugar on top heavily and serve right away.


COPYRIGHT (c) 2011

PATE A CHOUX

Pate A Choux (pronounced: pot ah shoe) is a classic French Pastry Dough that was first developed in the 1500's and has been modified to the versatile light puffed Dough we know today.  Pate A Choux is that amazing Dough used to make incredible EclairsCream Puffs and Profiteroles.  Pate A Choux sounds like it would be complicated to make but when you are Cooking The Amazing you know it is easy...and delicious.
      Cream Puffs and Eclairs are easy to make with Pate A Choux.


Here is the recipe.


1 stick Butter, no salt
1 c  Water
1 T  Sugar
1/4 t  Sea Salt, fine grain
1 c  All Purpose Flour
4 Large Eggs
1 Large Egg Yolk


1.  Preheat oven to 425 degrees.  Line a baking sheet with parchment paper or a silicone mat (like Silpat) or spray it with non stick oil spray (Like Pam).

2.  In a medium pot over medium heat add the Butter, Water, Sugar and Sea Salt and stir well.
Bring to a full boil while stirring fast with a spoon.

3.  Add all the All Purpose Flour to the boiling Butter mixture and quickly stir with a large spoon.
4.  Stir rapidly with a wooden spoon and it will quickly come together into a ball of Dough.  The bottom of the pan will become dry and a film will form on the bottom of the pan. Once a Dough ball forms, keep stirring moving the Dough around fast breaking it up and allowing it form a ball again for 1 minute.

5.  Transfer the Dough ball to a large mixing bowl if you are using a hand mixer or the bowl of a KitchenAid mixer fitted with the paddle attachment.  Let the Dough sit for 3 minutes in the bowl to cool. Then begin to mix on medium low speed for 30 secs. before adding the Eggs. 
6.  One by one, add the Eggs and then the Egg Yolk last as you mix, allowing each Egg to incorporate before adding the next Egg.  The Dough ball will break up and become wet, lumpy and glossy then will become thick and pasty as the Eggs incorporate.

7.  After well mixed, scrape the Dough into a large pastry bag fitted with a large tip for piping or you can use a large spoon to form shapes.  On to the prepared baking sheet pipe or spoon long 3-4 inch shapes of Dough if you plan to make Eclairs.  Pipe or spoon 2-3 inch mounds of Dough for Cream Puffs or Profiteroles.


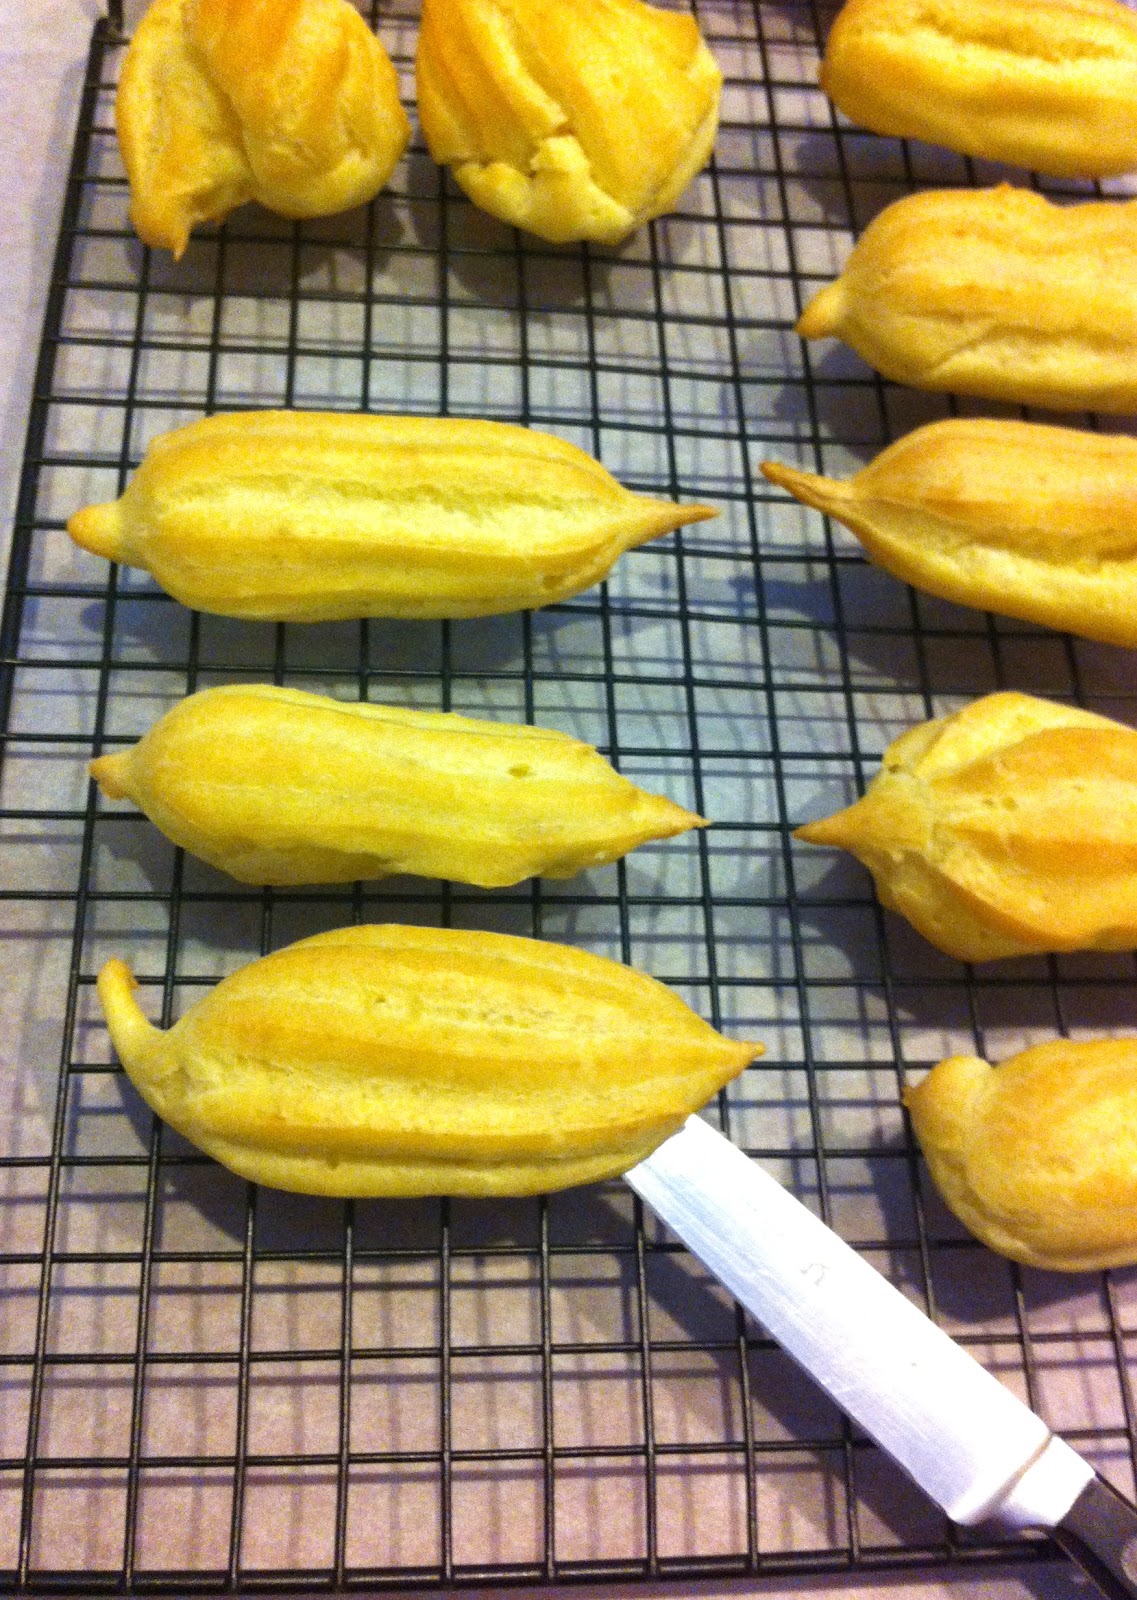
8.  Bake in the center of your oven at 425 degrees for 15  minutes then reduce the heat to 350 degrees and bake for 10-15 minutes more.  Do not open your oven to prevent falling!  Bake until the tops are browned and dry.  If the tops look "wet" or moist with droplets of moisture they still need to bake a little longer.  When they look done, remove a sacrificial one and open it up with knife.  If the inside is dry and cooked and not gummy, they are done.  Remove them from the oven.  Allow to sit on the baking sheet for 1 minute before moving to a wire rack to cool.


8.  Once on the wire rack, immediately pierce one end with a knife tip to let the steam out and keep the insides from being soggy.  Allow to cool completely before using in your recipe.


COPYRIGHT (c) 2011

January 17, 2011

AU GRATIN POTATOES


Au Gratin Potatoes are often confused with Escalloped Potatoes which is a similar recipe but is not made with Cheese.  I like them both but I can not resist anything baked with a rich, creamy Cheese Sauce, especially when it has crispy browned edges and layered between thin sliced Yellow Gold Potatoes.  When you bring this to the table and the Cheese Sauce is bubbling and browned, everyone will want to eat this first.  Serve this along side a Baked Ham or succulent Butter Roasted Chicken and you will be Cooking The Amazing.


Here is the recipe.


5  Large Yellow Gold Potatoes
2 T  Butter, softened
1  Medium Yellow Onion small diced
2  Garlic Cloves minced
3 T  Butter, unsalted
3 T  All Purpose Flour
3 c  Heavy Cream or Half And Half
1 t  Dried Thyme
1 t  Sea Salt, fine
1 t  Fresh Cracked Black Pepper
1 1/2 c  Sharp Cheddar Cheese, shredded
1 c  Parmesan Cheese, grated


1.  Preheat your oven to 400 degrees with the rack in the middle of your oven.

2.  Peel and thinly slice your Potatoes paper thin.  As thick as a thick Potato Chip.  I use a mandolin to slice mine thin but a large knife works well.
Using my mandolin.  The best ones are from Japan or France.  Use caution! A mandolin is very sharp! Be smarter than me and use the guard.


3.  Butter a large deep casserole dish all over well with 2 T of Butter.
4.  Dice the Onion into small dice.  Mince the Garlic fine.
5.  Saute over medium heat the Onion in 3 T of Butter until soft.  Add the Garlic and saute for 1 minute more.
6.  Add 3 T of Flour and stir well.  Cook for 2 minutes so the flour cooks.
7.  Add 3 c Heavy Cream or Half And Half, dried Thyme, Sea Salt and Pepper and mix in well.  Turn up the heat to medium high and bring to a boil constantly stirring.  Boil for 1 minute and reduce the heat to medium and simmer 4-5 minutes constantly stirring.
8.  The Sauce should be thick and coat the back of a spoon.  Remove the sauce pan from the heat.
9.  Add all the Cheddar Cheese and 1/2 c of the Parmesan Cheese off heat and stir in well.  The Sauce will thicken.  Taste the Sauce and adjust for Salt and Pepper if needed.
10.  Layer your Casserole dish with the thin layers of Potatoes over lapping as you go.
11.  Layer the Cheese Sauce between layers of sliced Potatoes ending with a layer of Cheese Sauce on top.
12.  Sprinkle the top with the remaining 1/2 c of Parmesan Cheese.  Cover with aluminum foil and place the dish on a cookie sheet to make transfer easier and safer to and from the oven.  Bake at 400 degrees for 1 hr 45 minutes covered.  Remove the foil and continue baking for 15 minutes more so the top will begin to brown.  Keep your casserole in the middle of the oven and turn your broiler on HIGH and broil the top until it is bubbling and well browned in spots for the best flavor.  Watch it close because the broiler can quickly cause it to burn.  It may take 5 minutes or so to broil the top well.  Remove from the oven and allow to sit for 15 minutes so the Sauce sets and you don't burn your tongue!  It's very hot right from the oven.


COPYRIGHT (c) 2011

January 1, 2011

HOMEMADE OREO COOKIES

There was a time in my life when I could eat an entire package of Oreo Cookies, Double-Stuff Oreos at that, and not even feel guilty about the gluttony that had taken place. I would start off with four or five Cookies and before I knew it, they would all be gone... along with a quart of Milk.  Ok, so that time in my life was just last week but I love Oreos!  What is it about that Chocolate Cookie sandwiching tasty Cream that we all love so much? I thought if I could make my own Homemade Oreo Cookies I just may find the answer and satisfy a sweet tooth I was having all in one. What resulted was a more adult tasting Cookie that was amazing in flavor with it's ever so deep dark Chocolate Cookies on the outside and a sweet velvety Vanilla Cream center. I started off eating just a few and before I knew it I had eaten them all. When you are Cooking The Amazing nostalgia only makes you more hungry.


Here is the recipe.


CHOCOLATE COOKIE

1 1/2 c  All Purpose Flour
1 c  Cocoa Powder
1 1/4 c  Brown Sugar, packed
1/4 t  Sea Salt, fine grain
1/2 t  Baking Soda
1 1/2  Sticks of Butter, softened
1  Large Egg
1 t  Vanilla Extract

VANILLA CREAM FILLING

12 oz  White Chocolate
6 0z  Heavy Whipping Cream
1 t  Vanilla Extract
1 c  Powdered Sugar


1. In a large bowl or the bowl of a KitchenAid, mix the Flour, Cocoa Powder, Brown Sugar, Salt and Baking Soda until well mixed. Use the best Cocoa Powder you can afford because it is the dominate flavor. But at the same time there is no need to fly to Paris to get a can of La Maison Du Chocolat Cocoa... after all, these are just Oreo Cookies wannabes! Just use a good quality Cocoa because you want this to taste amazing, right? (Ghirardelli is a good one.)

 
2. Slightly beat the Egg. On low speed, mix in the softened Butter and add the beaten Egg then the Vanilla Extract. The dough will look dry and grainy at first then will quickly come together to form a ball. Mix for about 2 minutes until the ball stays together.


3. Dump out the dough ball onto a large sheet of parchment paper or wax paper.

 
4. Using your hands, form the ball into a long round log shape about 12 inches long and 2 1/2 inches thick. Roll it back and forth and even it up with your hands on the ends. It will look like a giant Tootsie Roll and kind of ...well, it looks very creepy... but secretly delicious!


5. Use the parchment paper or wax paper and roll the log up smoothing it out and making it more round as you go with your hands. Then twist the ends tight and refrigerate for 1 1/2 hours until firm.


6. Preheat your oven to 350 degrees 20 minutes before you take the log out of the refrigerator. Spray a Cookie sheet with Vegetable Oil Spray (like Pam) or line a Cookie sheet with parchment paper to be ready for your Cookies. Remove the log of Dough and unroll the parchment paper. Cut thin 1/8 th inch slices of Dough and space them 1 inch apart on the Cookie sheet.


7. Bake at 350 degrees in the center of your oven for 12-13 minutes. Remove from the oven and allow to sit on the Cookie sheet for 4 minutes before you touch them or they will fall apart. Place them on a wire rack to cool completely for 1 hour so they crisp up.

 
8. While the Cookies cool make the Vanilla Cream Filling. Place 12 oz of White Chocolate Chips or chopped White Chocolate from a bar into a large bowl. Heat Heavy Whipping Cream to a boil over medium heat and remove it as it begins to boil and pour the hot Cream over the White Chocolate, pushing as much White Chocolate below the surface of hot Cream as you can.


TIP: For Mint Cream Chocolate Cookies: Add a 1-2 teaspoons of Mint Extract for a Mint filling when you add the Vanilla in step 10.


9. Allow it to sit undisturbed for 5 minutes so the White Chocolate can melt. Then whisk until the Cream and White Chocolate come together. It will have a pearly color to it and will be thin and liquidy at first.

 
10. Allow the mixture to sit on the counter for 1 1/2 hours to thicken. After it has thickened whisk in the Powdered Sugar and Vanilla Extract. It will be thick and spreadable.

 
11. Place it in a piping bag with a small round tip or use a spoon and put about 1 teaspoon of the filling on the center of a Cookie then top it with another Cookie pressing down gently so the filling spreads to the edges but not out the sides. Store in a cool place in an air tight container. These are best eaten the same day and after they have set up for 1-2 hours for the crispest Cookies and best firmness and flavor of the Cream Filling. The Cookies may get soft when stored but are still good.


COPYRIGHT (c) 2011